標籤

顯示具有 程式設計 標籤的文章。 顯示所有文章

2017年11月10日 星期五

ireport使用紀錄

真的超級難拉QAQ
希望以後更熟悉會比較會用
但是他限制真的很多
不過免費的就將就用囉


 「值」簡介
Styles:樣式
Parameter:參數,只有一個的參數適合放這邊,ex:列印者 申請日期等等
Fields:detail裡的欄位值
Variable:一些變數...或是計算出來的值

「區塊」簡介
Title:主題 
Page Header:每一頁的頭
Column Header:每一個detail的頭
Detail :資料(只設計一列,越多資料會自己長長)
Column Footer:每一個detail的尾
Page Footer:每一頁的頁尾
Last Page Footer:只有最後一頁出現的頁尾
Summary:摘要
No Data:沒有detail時出現的
Background:背景(可以加浮水印啥的)

P.S.還可以自己加group,但是還不明白準確的使用方式

「調色板」簡介
只記錄我用過的,排序以我最常用的先

Static Text:固定的字
Text Field:會動的字
Line:直線
Frame:區塊
Rectangle:方框
Barcode:條碼
Subreport:子報表
Page number:本頁頁碼
Total pages:總頁數
Image:圖


報表屬性設定 

Page size > Orientation:
Pottrait:直的(預設)
Landscape:橫的
Margins:邊界大小
More > Title on a new page:title自己占第一頁,若需要封面時可打勾
More > Summary on a new page:Summary自己佔最後一頁,需要的話打勾(注意:若summary不是自己一頁的話,會在column footer上面
More > Summary with Header and Footer:Summary那單獨一夜的時候也要有page Header and Footer,需要的話打勾
More > Float column footer: 若detail未填滿,column footer會直接接著detail,中間無空白(注意:若summary不是自己一頁的話,column footer會連著summary)
More > Ignore pagination:若打勾則不分頁
More > When No Data:當無資料時,預設無頁面,若需顯示No Data區塊則改選No Data Section

區塊屬性設定
Print When Expression:當敘述為true,顯示區塊
Split Type:當內容超過區塊高度,
Immediate:直接顯示不完整內容
Prevent :到新的一頁顯示完整內容
Stretch :延伸顯示當前內容


調色板通用屬性設定
Left、Top:位置設定(相對於所在區塊)
Width、Height:大小
Opaque:是否透明(有勾是透明)
Position Type:
Fix Relative Top:固定於區塊頂部
Float:浮動(!!!超好用)
Fix Relative Bottom:固定於區塊底部
Text Field 屬性設定
Text Fild Expression:除了可以放參數,還可以下條件式~~
Blank When Null:若值為null則顯示空白,沒勾就會顯示n u l l
Stretch With Overflow:若沒勾則超過大小的內容會卡掉
字體設定等照字面翻譯即可

Barcode設定
選Barcode4J > Code 128
Image設定
注意路徑須為絕對路徑
可以用Parameter傳入路徑,方便動態調整
groovy中,路徑可用:
new File(“相對路徑”).getAbsolutePath()  //mac可用,window不可用
Executions.getCurrent().getDesktop().getWebApp().getRealPath("/")+"相對路徑"

           
 若有好多欄位會放在同一個橫排的感覺,可以用frame包起來,若有須自動延伸的欄位看起來也會比較整齊,向下延伸,下方整個也會向下
  

 若想在detail與summery中間放東西,可新增一個group,就會多一個 xx Group Header 和xx Group Footer,東西放在xx Group  Footer就會連著detail而且在summary上面~
為神魔要這樣呢?因為Column  Footer如果放動態資料超過一頁的話會錯誤,所以只能放在summary 

以上為我自己的理解,
此網頁為更明確的介紹


2017年2月19日 星期日

Android-使用webService

因為專題要使用ASP.NET Web service
然後介面要有網頁單機跟APP
因為APP實在是太不熟悉惹
所以趕快來做個紀錄


這個完完全全只是練習連接的部分
所以包括web service的設計都只有兩種
一種是沒有傳值過去
一種是有傳值


一開始是新增專案...
好哦完全沒有難度
就這樣
然後我沒有選7.0的系統
因為聽說好像不是很好用


第一步呢
先下載一個叫做"Ksoap2"的東西
放到你專案的資料夾裡

然後回到你的專案
看到他了沒
看到之後就右鍵
選倒數第二個"Add as Library"


然後問你要加到哪
我沒試過其他的有興趣可以試試

然後我的介面...


我希望一打開會跑測試1
按完按鈕會跑測試2

然後程式來了
我習慣在開一個檔案放非主程式的部分啦
看你們喜歡


好了~一個空白的檔案
乾乾淨淨


[webConect.java]

import org.ksoap2.SoapEnvelope;
import org.ksoap2.serialization.SoapObject;
import org.ksoap2.serialization.SoapSerializationEnvelope;
import org.ksoap2.transport.HttpTransportSE;

public class webConect {
    /** 宣告連接 Web Service的基本資料*/
    private static final String NAMESPACE = "http://120.125.76.185/ECG_Webservice/" ;
    private static final String URL = " http://120.125.76.185/ECG/ECG_webservice.asmx";

    public String text1(){
/** 將EditText中的值傳給 Web Service*/
        SoapObject request = new SoapObject(NAMESPACE,"text1");
/** 設定呼叫 Web Service一些值*/
        SoapSerializationEnvelope envelope = new SoapSerializationEnvelope(SoapEnvelope.VER11);
        envelope.dotNet = true;
        envelope.bodyOut=request;//envelope.setOutputSoapObject(request);//擇一使用
        HttpTransportSE androidHttpTransport = new HttpTransportSE( URL);
        androidHttpTransport.debug = true; // 測試模式使用
        try
        {
/** 開始呼叫 Web Service*/
            androidHttpTransport.call(NAMESPACE+"text1", envelope);
            // 获取返回的数据
            SoapObject object = (SoapObject) envelope.bodyIn;
            // 获取返回的结果
            String result = object.getProperty(0).toString();
            return result;
        }
        catch(Exception e) {
            return e.toString();
        }
    }
    public String text2(String SS){
/** 將值傳給 Web Service*/
        SoapObject request = new SoapObject(NAMESPACE,"text2");
        request.addProperty("s",SS);
/** 設定呼叫 Web Service一些值*/
        SoapSerializationEnvelope envelope = new SoapSerializationEnvelope(SoapEnvelope.VER11);
        envelope.dotNet = true;
        envelope.bodyOut=request;
        envelope.setOutputSoapObject(request);
        HttpTransportSE androidHttpTransport = new HttpTransportSE( URL);
        androidHttpTransport.debug = true; // 測試模式使用
        try
        {
/** 開始呼叫 Web Service*/
            androidHttpTransport.call(NAMESPACE+"text2", envelope);
            // 获取返回的数据
            SoapObject object = (SoapObject) envelope.bodyIn;
            // 获取返回的结果
            String result = object.getProperty(0).toString();
            // 将WebService返回的结果显示在TextView中
            return result;
        }
        catch(Exception e) {
            //e.printStackTrace();
            return e.toString();
        }
    }
}


主要連接就這樣喔
再來就是超級討厭害我找很久不知道哪裡錯的地方了
第一個是權限問題
這個檔案打開來


然後加上一行
<uses-permission android:name="android.permission.INTERNET" />

位子在這邊
這個就過關了

然後還有一個
執行緒的問題
主頁程式裡面使用webConect
要用Thread來跑
不然不能用
Thread thread = new Thread(){
        public void run(){
            txt1.setText(wc.text1());
        }
    };

要執行的地方就加上thread.start();


基本上先到這邊好了
不過還有些小問題還沒解決
就之後找到了再補上囉

2017年1月31日 星期二

迷你備忘錄練習-Android

Android設計真的是說難好像也還好
說簡單好像又不是那麼簡單

這個小範例包括:
1. ListView選項動態控制
2. 跨頁面傳值
主要是這兩個
至於監聽我在C#好像很少用到這個概念?(還是其實有哈哈哈學藝不精)
反正也是做個小小記錄
因為前面練習監聽設計的範例有點簡單哈哈哈(單純不想打開專案)

然後這個範例
不 能 存 檔 !!!
而且只有六格
所以基本上關掉備忘錄就不見拉
沒有實際用途


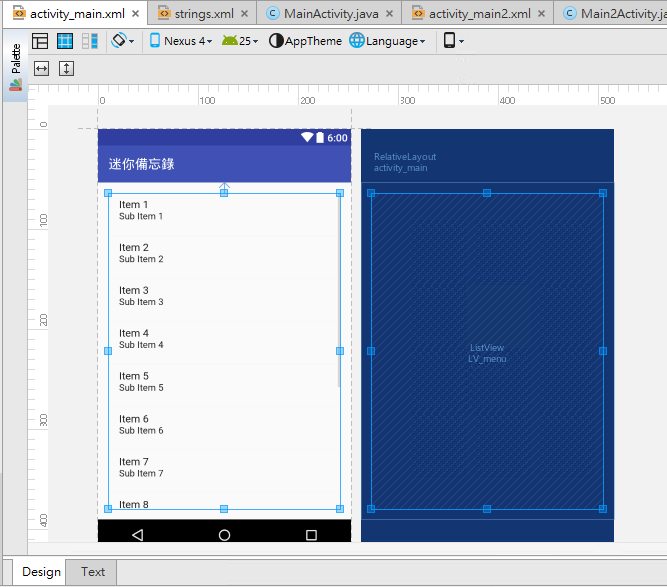
開始先拉畫面嚕沒什麼難度


介紹一下
Android的畫面是XML寫的
activity_main.xml就是畫面排版阿樣式設計阿放的地方
MainActivity,java是主程式的檔案
string.xml是放一些activity_main.xml會用到的文字或陣列
像是標題 "迷你備忘錄" 就是放在那裏
檔案大概的位置這樣


重點一來拉~
我要來做ListView選項動態控制

我的ListView的id是LV_tatle //這個是在activity_main.xml設定
然後程式的部分 //被馬掉的部分代表還沒介紹到先打的

來喔文字檔一一介紹:(綠字是自己要打的,黃字是打完會產生的,紅字是講解)
public class MainActivity extends AppCompatActivity
implements AdapterView.OnItemClickListener,AdapterView.OnItemLongClickListener//你需要用到的監聽
{
    ListView LV; //新增一個物件
    String[] item; //我需要的項目字串陣列
    @Override
    protected void onCreate(Bundle savedInstanceState) {
        super.onCreate(savedInstanceState);
        setContentView(R.layout.activity_main);
        //
        LV=(ListView)findViewById(R.id.LV_tatle);//就...找到那個id...反正就那樣//這常用喔
        LV.setOnItemClickListener(this);//監聽按一下項目事件
        LV.setOnItemLongClickListener(this);//監聽長按項目事件
        item=new String[]{"1.","2.","3.","4.","5.","6."};//設定項目字串
        LV.setAdapter(new ArrayAdapter<String>(this,R.layout.support_simple_spinner_dropdown_item,item));//用ArrayAdapter<String>來把陣列設定進ListView的項目裡
    }

    @Override
    public void onItemClick(AdapterView<?> parent, View view, int position, long id) {
        //按一下項目要做的事
    }

    @Override
    public boolean onItemLongClick(AdapterView<?> parent, View view, int position, long id) {
        return false;
        //長按項目要做的事
    }
}

好了
來整理一下
使用ListView可以用些什麼(只說程式要寫什麼,樣式不管我不會)
1. 先新增一個ListView物件,指向你介面的那個ListView
    ListView LV=(ListView)findViewById(R.id.LV_tatle);
2. 需要做監聽
    (1)implements AdapterView.OnItemClickListener,AdapterView.OnItemLongClickListener
    (2)LV.setOnItemClickListener(this);//監聽按一下項目事件
         LV.setOnItemLongClickListener(this);//監聽長按項目事件
3. 動態設定項目
    (1)要有一個陣列
    (2)要有一個ArrayAdapter<???(資料型別)> ArrayAdapter_=
     new ArrayAdapter<String>(this,R.layout.support_simple_spinner_dropdown_item,你的陣列名稱)
    (3) LV.setAdapter(ArrayAdapter_);

好啦不難吧


再來做跨頁面傳值
先要新增一個頁面
就是按一下ListView的選項會跳到的編輯頁面


然後就取名字
看心情高興改就改吧反正我是沒改


再來介紹程式碼的部分:
先說簡單版的
就是第一頁有傳值給第二頁
可是第二頁沒有要回傳給第一頁的時候
在MainActivity,java//第一頁的程式
Intent It=new Intent(this, Main2Activity.class);
It.putExtra("item",1); //要傳的值是1的話,不一定要數字,字串也可
startActivity(It); //打開第二頁
在Main2Activity,java//第二頁的程式
 Intent It=getIntent(); //把自己打開(應該...吧
 note=It.getStringExtra("item"); //取得傳過來的值
finish(); //結束第二頁,回第一頁


這次要用的是要回傳的
反正就是會有多一個識別碼
然後多一個事件
至於識別碼跟事件的關聯還沒研究
之後了解了再做更新

在MainActivity,java//第一頁的程式
        It.putExtra("note",item[position]);
        startActivityForResult(It,position);//startActivity(It); 原本是這個,換一個加上識別碼的

    protected void onActivityResult(int requestCode,int resultCode,Intent it){
        if(resultCode==RESULT_OK){//如果回傳OK的話
            item[requestCode]=it.getStringExtra("note");
            AA.notifyDataSetChanged();//LV的Array更新陣列
        }
    }

在Main2Activity,java//第二頁的程式
        Intent It=getIntent(); //一樣打開自己
        note=It.getStringExtra("note");//取得傳來的值
        Intent it2=new Intent(); //要傳回去噠
        it2.putExtra("note",txv_id.getText()+" "+ET_note.getText()); //要傳回去的值
        setResult(RESULT_OK,it2); //如果確定要傳回去了,附加一個OK

        setResult(RESULT_CANCELED);//如果沒有值要回傳
        finish();


全部全部程式碼來嚕~
先上圖


程式 文字檔:
MainActivity.java

package com.example.aa206.a0201_1;

import android.content.Intent;
import android.support.v7.app.AppCompatActivity;
import android.os.Bundle;
import android.view.View;
import android.widget.AdapterView;
import android.widget.ArrayAdapter;
import android.widget.ListView;

public class MainActivity extends AppCompatActivity
implements AdapterView.OnItemClickListener,AdapterView.OnItemLongClickListener{
    ListView LV;
    Intent It;
    ArrayAdapter<String> AA;
    String[] item;
    @Override
    protected void onCreate(Bundle savedInstanceState) {
        super.onCreate(savedInstanceState);
        setContentView(R.layout.activity_main);
        //
        It=new Intent(this, Main2Activity.class);
        LV=(ListView)findViewById(R.id.LV_menu);
        LV.setOnItemClickListener(this);
        LV.setOnItemLongClickListener(this);
        item=new String[]{"1.","2.","3.","4.","5.","6."};
        AA=new ArrayAdapter<String>(this,R.layout.support_simple_spinner_dropdown_item,item);
        LV.setAdapter(AA);
    }
    public void onItemClick(AdapterView<?> parent, View view, int position, long id) {
        It.putExtra("note",item[position]);
        startActivityForResult(It,position);
    }
    @Override
    public boolean onItemLongClick(AdapterView<?> parent, View view, int position, long id) {
        item[position]=position+".";
        AA.notifyDataSetChanged();
        return false;
    }
    protected void onActivityResult(int requestCode,int resultCode,Intent it){
        if(resultCode==RESULT_OK){
            item[requestCode]=it.getStringExtra("note");
            AA.notifyDataSetChanged();
        }
    }
}

Main2Activity.java


package com.example.aa206.a0201_1;

import android.content.Intent;
import android.support.v7.app.AppCompatActivity;
import android.os.Bundle;
import android.view.View;
import android.widget.EditText;
import android.widget.TextView;

public class Main2Activity extends AppCompatActivity {
    TextView txv_id;
    EditText ET_note;
    int id;
    String note;
    @Override
    protected void onCreate(Bundle savedInstanceState) {
        super.onCreate(savedInstanceState);
        setContentView(R.layout.activity_main2);
        //
        txv_id=(TextView)findViewById(R.id.txv_id);
        ET_note=(EditText)findViewById(R.id.eT_note);
        //
        Intent It=getIntent();
        note=It.getStringExtra("note");
        //
        txv_id.setText(note.substring(0,2));
        if(note.length()>3)
            ET_note.setText(note.substring(3));
    }
    public void onSave(View v){
        Intent it2=new Intent();
        it2.putExtra("note",txv_id.getText()+" "+ET_note.getText());
        setResult(RESULT_OK,it2);
        finish();
    }
    public void onCancel(View v){
        setResult(RESULT_CANCELED);
        finish();
    }

}

2016年11月28日 星期一

ASP.NET C# 動態新增textbox且讀取輸入的值

Default.aspx:


Default.aspx.cs:


Button1:動態新增一個textbox,ID="txt_1"
Button2:讀取txt_1.text放到label

程式碼:

 protected void Page_Load(object sender, EventArgs e)
    {
        if( ViewState["Ctl_count"]!=null)
        {
            TextBox txb = new TextBox();
            txb.ID = "txt_1";
            Panel1.Controls.Add(txb);
            ViewState["Ctl_count"] = 1;
        }
    }
    
    protected void Button1_Click(object sender, EventArgs e)
    {
        TextBox txb = new TextBox();
        txb.ID = "txt_1";
        Panel1.Controls.Add(txb);
        ViewState["Ctl_count"] = 1;
    }
    protected void Button2_Click(object sender, EventArgs e)
    {
        TextBox txb = (TextBox)Panel1.FindControl("txt_1");
        Label1.Text = txb.Text;

    }


程式重點:


  • 由於動態新增的物件會在按Button2的時候,跑到Load整個洗掉,所以利用 ViewState["Ctl_count"] 來記錄擬新增了幾個物件。
  • 我這個範例固定新增一個看不太出來,但是如果是不能確定會新增幾個的時候就很需要了。
  • 如果是一開始就直接動態新增可以寫進Page_Init裡面。
  • 控制項的初始化(Initialize)的動作一定要放在 Page_Init 事件中!控制項的初始化也包括設定控制項的預設值(Default Value)。千萬不能將設定控制項初始值的程式碼寫在 Page_Load 事件裡,否則當 PostBack 回來的值會被 Page_Load 事件中的程式碼蓋掉。動態將控制項加入到 ASP.NET 頁面中「最好」在 Page_Load 事件中執行,以確保在後續事件中可以取得頁面中所有的控制項。==>這是網路上找的原話


2016年9月14日 星期三

ASP.NET 擴充套件-網頁文字編輯器CKEditor


下載:
官方網站:http://ckeditor.com/download


使用前:
把ckeditor_aspnet_3.6.6.2\bin\Release\CKEditor.NET.dll
加入工具箱內就可以用了
步驟:工具箱內隨意右鍵=>選擇項目=>瀏覽=>選CKEditor.NET.dll=>確定

使用:
<script src="//cdn.ckeditor.com/4.6.0/basic/ckeditor.js"></script>
<CKEditor:CKEditorControl ID="CKEditorControl1" runat="server"></CKEditor:CKEditorControl>

2016年8月31日 星期三

textBox打字時可出現輔助查詢單字的一小部分程式碼

同學要做
像是打AA BB CC
文字游標在CC之後
按ctrl+A把DatagridView顯示在文字游標旁
DatagridView會顯示資料庫裡開頭是CC的值(假設是CCDD
然後選擇CCDD後
會取代掉CC
變成AA BB CCDD
@@@@@@@@@@@@@@@@@@@@@@@@@@@@@@@
我幫忙的部分沒有資料庫那一塊
所以就是
像是打AA BB CC
文字游標在CC之後
按ctrl+A把DatagridView顯示在文字游標旁
然後有兩種
1.
同學做的是用取代的方式
按DatagridView會把CC取代成我要的(假設是CCDD)
小問題是如果前面也有CC
如AA BB CC AA CC
我只要取代後面的CC但是前面的也會一起被取代
變成AA BB CCDD AA CCDD
2.
我做的放在Button
用 刪除字(空白後());插入字串();
也可以把CC取代成我要的
但是小問題是換行不算空白
所以會連前一行的最後一個字串一起刪掉


------------------------------------------------------------------------------------------------------------------------------------
        string cmdText, insertText, txt;
        string[] stringArray;
        int txt1;
        Point p, P;
        private void textBox1_KeyDown(object sender, KeyEventArgs e)//按ctrl+A把DatagridView顯示在文字游標旁
        {
            if (e.KeyCode == Keys.A && e.Control == true)
            {
                if (e.KeyCode == Keys.A)
                {
                    p = GetCursorPos(this.textBox1.Handle.ToInt32());
                    this.label1.Text = string.Format("Line:{0}, Col:{1}", p.X, p.Y);
                    P.X = (p.Y) * (int)textBox1.Font.Size + textBox1.Location.X ;
                    P.Y = (p.X+1) * (int)textBox1.Font.Size + textBox1.Location.Y;
                    dataGridView1.Location = P;
                    dataGridView1.Show();
                    //抓空白
                    stringArray = textBox1.Text.Split(' ', '\n');
                    //抓陣列最後一個字串
                    txt = stringArray[stringArray.Length - 1];
                }
            }
        }
        //
        #region 游標在第幾行第幾個
        const int EM_GETSEL = 0xB0;
        const int EM_LINEFROMCHAR = 0xC9;
        const int EM_LINEINDEX = 0xBB;
        [DllImport("user32.dll", EntryPoint = "SendMessage")]
        public static extern int SendMessage( int hwnd, int wMsg,int wParam,ref int lParam );
     
        public Point GetCursorPos(int TextHwnd)
        {
            int i = 0, j = 0, k = 0;
            int lParam = 0, wParam = 0;
            i = SendMessage(TextHwnd, EM_GETSEL, wParam, ref lParam);
            j = i / 65536;
            int lineNo = SendMessage(TextHwnd, EM_LINEFROMCHAR, j, ref lParam) + 1;
            k = SendMessage(TextHwnd, EM_LINEINDEX, -1, ref lParam);
            int colNo = j - k + 1;
            Point ret = new Point(lineNo, colNo);
            return ret;
        }
        #endregion
        private void dataGridView1_CellClick(object sender, DataGridViewCellEventArgs e)
        {
            //將選取內容插入鼠標位置
            string insertText = "選取內容";
            int insertPos = textBox1.SelectionStart;
            //刪除游標所在的陣列
            textBox1.Text = textBox1.Text.Replace(txt, insertText);
            textBox1.SelectionStart = insertPos + insertText.Length;
            //關閉dataGridView
            dataGridView1.Visible = false;
        }
        private void button1_Click(object sender, EventArgs e)//刪除游標前一個字元加入我要的字串
        {
            刪除字(空白後());
            插入字串();
        }
     
        public void 刪除字(int CC)
        {
            int insertPos = textBox1.SelectionStart;
            char[] c = textBox1.Text.ToCharArray();
            textBox1.Text = "";
            for(int y=0;y< CC;y++)
            c[insertPos - 1-y] = ' ';
            for (int i = 0; i < c.Length; i++)
            {
                bool BB = true;
                for (int y = 0; y < CC; y++)
                    if (i == insertPos - 1 - y)
                    {
                        BB = false;
                        break;
                    }
                if (BB)
                    textBox1.Text += c[i];
            }
             
        }
        public int 空白後()
        {
            int CC = 0;
            int insertPos = textBox1.SelectionStart;
            insertPos--;
            char[] c = textBox1.Text.ToCharArray();
            while(c[insertPos--]!=' ')
            {
                CC++;
            }
            return CC;
        }
        public void 插入字串()
        {
            string insertText = "";
            int insertPos = textBox1.SelectionStart;
            textBox1.Text = textBox1.Text.Insert(insertPos, insertText);
            textBox1.SelectionStart = insertPos + insertText.Length;
        }

由txt檔讀取數值繪製波形


using System;
using System.Collections.Generic;
using System.ComponentModel;
using System.Data;
using System.Drawing;
using System.Linq;
using System.Text;
using System.Threading.Tasks;
using System.Windows.Forms;
using System.IO;
namespace HRV_波形
{
    public partial class Form1 : Form
    {
        public Form1()
        {
            InitializeComponent();
        }
        float ff;
        List<int> ii = new List<int>();//動態陣列
        private void Form1_Load(object sender, EventArgs e)
        {
            StreamReader sr = new StreamReader(@"E:\raw.txt");
            //===一次讀取全部內容===
            string a = sr.ReadToEnd();
            richTextBox1.Text = a;//顯示在textbox
            sr.Close();
            //
            sr = new StreamReader(@"E:\raw.txt");
            string line;
            List<string> iii = new List<string>();
            while (!sr.EndOfStream)//一次讀一行(一個值)
            {
                line = sr.ReadLine();
                iii.Add(line);
            }
            for (int aaa = 0; aaa < iii.Count; aaa++)//由字串轉成數值
            {
                if (iii[aaa] != "" && iii[aaa] != null)
                    ii.Add(int.Parse(iii[aaa]));
            }
            sr.Close();
            //設定panel大小
            panel2.Width = ii.Count * 2;
            panel2.Height = panel1.Height;
            ff = panel1.Height / 260;
        }
     
        private void panel2_Paint(object sender, PaintEventArgs e)
        {
            Graphics g = panel2.CreateGraphics();
            //
            List<Point> MyPoint = new List<Point>();
            Pen Mypen = new Pen(Color.Blue);
            Point p = new Point();
            for (int b = 0; b < ii.Count; b++)
            {
                int c = ii[b];
                p.X = b;
                p.Y = 250 - c;
                MyPoint.Add(p);
            }
            for (int b = 1; b < MyPoint.Count; b++)
            {
                g.DrawLine(Mypen, MyPoint[b - 1], MyPoint[b]);
            }
        }
        private void button1_Click(object sender, EventArgs e)
        {
            panel2.Invalidate();//重繪
        }
    }
}

封包解碼

要找出綠色那邊的資料~~

        string s, ss, a;
        char[] line;
        int[,] ll = new int[64, 32];
        private void Form1_Load(object sender, EventArgs e)
        {
           
            System.IO.StreamReader file =new System.IO.StreamReader(@"E:\實習\鈺婷\1.asc", Encoding.ASCII);//匯入檔案
            s = file.ReadToEnd();//讀取檔案到最後
            textBox1.Text = s;
            line = s.ToCharArray();//字串轉成字元陣列
            int x = 0;
            for(int i=0;i<line.Length-1;i++)//一個字一個字識別是不是我要的//取得8=XX後的32byte資料
            {
                ss = line[i].ToString() + line[i+1].ToString();
                if (ss=="8=")
                {
                    //
                    textBox2.Text += line[i].ToString() + line[i + 1].ToString() + line[i + 2].ToString()+ line[i + 3].ToString() + line[i + 4].ToString();//顯示8=XX
                    //找後面32bytes
                    for (int y=0;y<32;y++)
                    {
                        a += line[i + 5 + y].ToString();
                        ll[x,y] = line[i + 5 + y];
                        textBox2.Text += "," + ll[x,y];
                    }
                    x += 1;
                    textBox2.Text += "\r\n";
                    if (x >= 64)//目前是64筆資料
                        break;
                    //
                }
            }
           
        }

用藍芽收發文件

程式碼 :
using System;
using System.Collections.Generic;
using System.ComponentModel;
using System.Data;
using System.Drawing;
using System.Linq;
using System.Text;
using System.Threading.Tasks;
using System.Windows.Forms;
using System.IO;
using InTheHand.Net;
using InTheHand.Net.Sockets;
using System.IO;
using System.Threading;
using InTheHand.Net.Bluetooth;
using System.Net.Sockets;
using InTheHand.Windows.Forms;
//using System.Diagnostics;
using Brecham.Obex;
using Brecham.Obex.Objects;
using System.Net;
//using DragAndDropFileControlLibrary;//托放作品

namespace Ex1
{
    public partial class Form1 : Form
    {
        
        //BluetoothClient client;
        //Stack<ListViewItem[]> previousItemsStack = new Stack<ListViewItem[]>();
        //ObexClientSession session;
        //string localAds;
        //BluetoothAddress mac = null;//地址
        //BluetoothEndPoint localEndpoint = null;//送出端
        //BluetoothClient localClient = null;//接收端
        //BluetoothComponent localComponent = null;
        BluetoothRadio radio = null;//蓝牙适配器  
        string sendFileName = null;//发送文件名  
        BluetoothAddress sendAddress = null;//发送目的地址  
        ObexListener listener = null;//监听器  
        string recDir = null;//接受文件存放目录  
        Thread listenThread, sendThread;//发送/接收线程  
        public Form1()
        {
            InitializeComponent();
            
            radio = BluetoothRadio.PrimaryRadio;//获取当前PC的蓝牙适配器  
        }

       
        private void Connect()
        {
            
            using (SelectBluetoothDeviceDialog bldialog = new SelectBluetoothDeviceDialog())// SelectBluetoothDeviceDialog是一个InTheHand.Net.Personal提供的窗体,用于选择蓝牙设备
            {
                if (bldialog.ShowDialog() == DialogResult.OK)
                {
                    sendAddress = bldialog.SelectedDevice.DeviceAddress;//获取选择的远程蓝牙地址  
                    label2.Text = "地址:" + sendAddress.ToString() + "    設備名:" + bldialog.SelectedDevice.DeviceName;
                }  
            }
        }
        private void sendFile()//发送文件方法  
        {
            ObexWebRequest request = new ObexWebRequest(sendAddress, Path.GetFileName(sendFileName));//创建网络请求  
            WebResponse response = null;
            try
            {
                button發送.Enabled = false;
                request.ReadFile(sendFileName);//发送文件  
                label發送狀態.Text = "開始發送!";
                response = request.GetResponse();//获取回应  
                label發送狀態.Text = "發送完成!";
            }
            catch (System.Exception ex)
            {
                MessageBox.Show("發送失敗!", "提示", MessageBoxButtons.OK, MessageBoxIcon.Warning);
                label發送狀態.Text = "發送失敗!";
            }
            finally
            {
                if (response != null)
                {
                    response.Close();
                    button發送.Enabled = true;
                }
            }
        }  
        private void buttonListen_Click(object sender, EventArgs e)//开始/停止监听  
        {
            if (listener == null || !listener.IsListening)
            {
                radio.Mode = RadioMode.Discoverable;//设置本地蓝牙可被检测  
                listener = new ObexListener(ObexTransport.Bluetooth);//创建监听  
                listener.Start();
                if (listener.IsListening)
                {
                    buttonListen.Text = "停止";
                    label1.Text = "開始監聽";
                    listenThread = new Thread(receiveFile);//开启监听线程  
                    listenThread.Start();
                }
            }
            else
            {
                listener.Stop();
                buttonListen.Text = "監聽";
                label1.Text = "停止監聽";
            }
        }
        private void receiveFile()//收文件方法  
        {
            ObexListenerContext context = null;
            ObexListenerRequest request = null;
            while (listener.IsListening)
            {
                context = listener.GetContext();//获取监听上下文  
                if (context == null)
                {
                    break;
                }
                request = context.Request;//获取请求  
                string uriString = Uri.UnescapeDataString(request.RawUrl);//将uri转换成字符串  
                string recFileName = recDir + uriString;
                request.WriteFile(recFileName);//接收文件  
               
            }
        }  
        private void button1_Click(object sender, EventArgs e)//連接藍芽
        {
            Connect();
        }
        private void button選擇文件_Click(object sender, EventArgs e)
        {
            OpenFileDialog opp=new OpenFileDialog();
            if (opp.ShowDialog() == DialogResult.OK)
            {
                sendFileName = opp.FileName;
                label發送文件名.Text = "文件:" + sendFileName;
            }
        }
        private void button發送_Click(object sender, EventArgs e)
        {
            sendFile();
        }
        private void button選擇目錄_Click(object sender, EventArgs e)
        {
            FolderBrowserDialog opd = new FolderBrowserDialog();
            opd.Description = "请选择蓝牙接收文件的存放路径";
            if (opd.ShowDialog() == DialogResult.OK)
            {
                recDir = opd.SelectedPath;
                label接收目錄.Text = recDir;
            }  
        }

    }
}
 

之前玩藍芽器材的時候做練習的
痾這好像是度娘的資源哈哈
總之程式設計就是一種練習找資料的事情厄